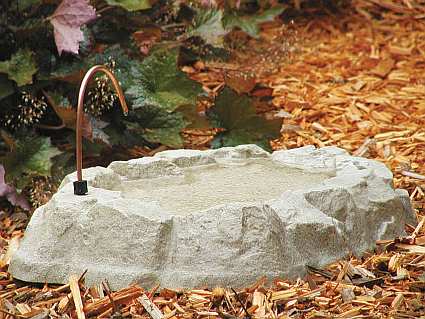
Rocky Mountain Spring Bird Bath
$109.99
$124.99
You Save : $15 (12%)
- SKU: BNAAB211
- Availability: In Stock
- Shipping:
Bath Options:
Related Categories:
Category : Non-Heated Bird Baths
Category : Ground Bird Baths
Category : Bird Waterers
Category : Bird Bath Agitators, Drippers, Misters, Waterfalls
Description
Our Most Popular Ground Bird Bath...The birds just love this bath year-round!
The Rocky Mountain Spring bird bath appears to be made of natural stones that just happens to form a shallow pool with multiple levels and varying water depths. This bath sits nicely on your lawn or nestles into your garden. It's easy to clean, because it's so light weight that you can lift it with one finger. Yet it's very strong, because it's made from weatherable polymer, the same material as football helmets.
This is a beautiful and economical point of focus for your backyard. For even more bird-attracting power in summer, check out the model with the dripper (shown below). Bath with dripper is optional.

Color: Tan
Dimensions: 24-3/4"L x 17-1/2"W x 4-3/4"H
Where to Locate your Rocky Mountain Spring Birdbath with Dripper
- Areas already frequented by birds: often this is near a bird feeder. However, do not position the birdbath too close to the feeder, as seeds and hulls will fall into the bath.
- Easily viewed from a location where you frequently sit to watch birds, about 20 to 40 ft from your home or porch.
- To the east or north of your observation point. This will put the sun at your back for afternoon viewing.
- Near trees and shrubs for cover and under a small tree.
- Relatively level ground (this makes installation easier).
- Avoid dense ground cover which can hide a cat.
Installation
The bath itself is designed to sit on top of the ground. If the area you selected is exposed to high winds, you may wish to build soil up about an inch around the outside edge of the bath to ensure that wind cannot get under the bath. If the location you select is not level, you will need to remove dirt from the high side and fill in the lower side. When the location is approximately level, set the bath in place and fill with water. Do additional leveling if required. Note that one portion of the bath has a notch slightly deeper than any other portion. This is where excess water should overflow.
Once you are satisfied with the placement and leveling of the bath, connect the tubing to the faucet. You can hide the tubing by opening a slit in the ground with a shovel, and inserting the tubing into the slit, and then pressing the slit closed over the tubing.